
To make a magnetic knife holder, you will need a wooden board and strong magnets. Attach the magnets to the board and hang them on your wall, creating a convenient storage solution for your knives.
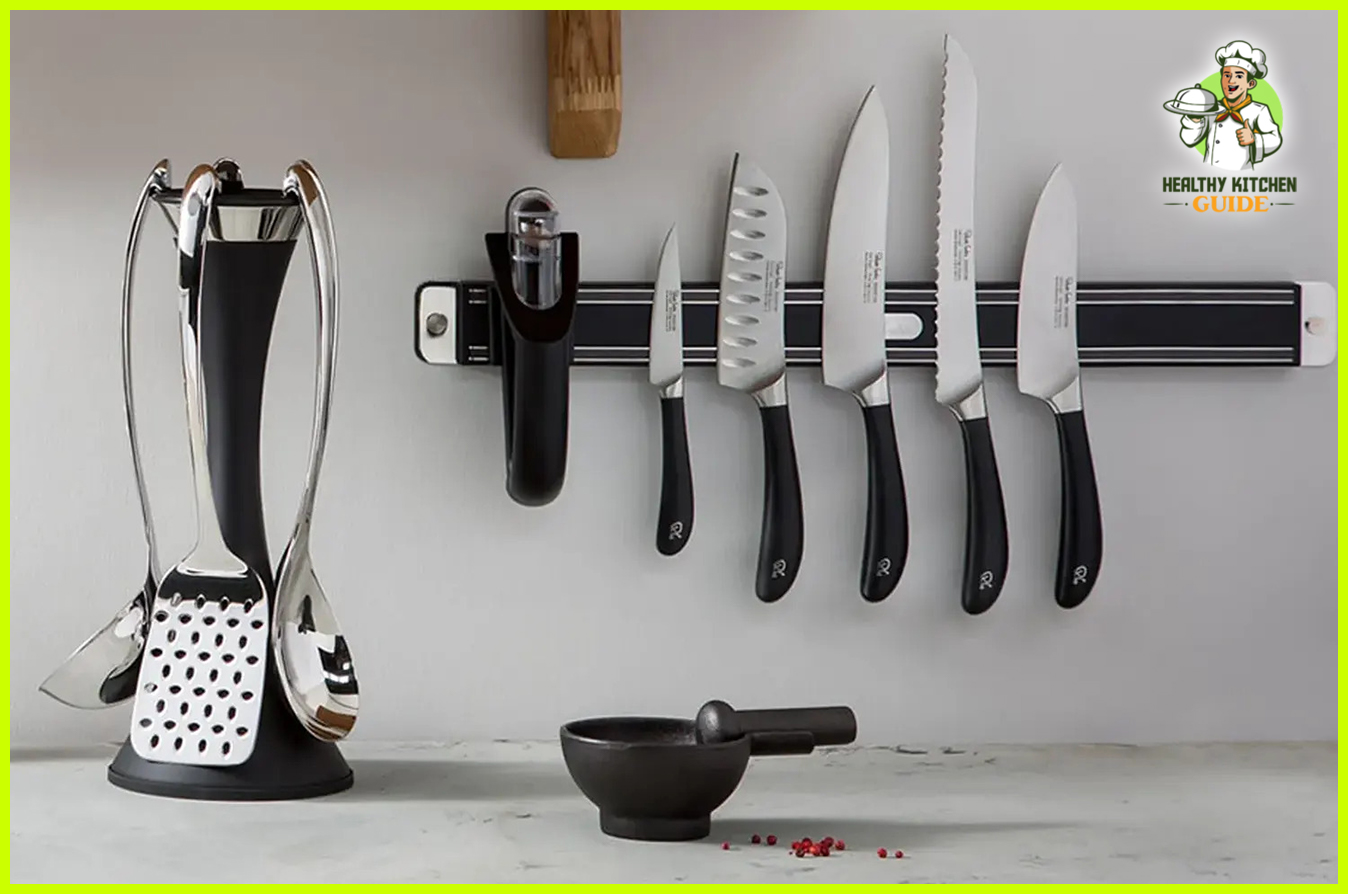
Having a magnetic knife holder in your kitchen not only keeps your knives organized and easily accessible but also adds a stylish touch to your culinary space. A magnetic knife holder eliminates the hassle of rummaging through drawers or fumbling with knife blocks, making it a practical and space-saving solution.
Creating your own magnetic knife holder is a simple and rewarding project that requires minimal materials and time. By following a few easy steps, you can customize a wooden board to serve as a magnetic surface where your knives can be securely hung. We will guide you through the process of making a magnetic knife holder to enhance the functionality and aesthetic appeal of your kitchen.
Choosing The Right Materials
When making a magnetic knife holder, it is important to choose the right materials. First, you need to determine the size of the holder based on the number and size of knives you want to store. This will help you determine the length and width of the base.
Next, you need to select a suitable type of wood or metal for the base. Wood options include hardwoods like oak or walnut, which are durable and have an appealing aesthetic. Metal options include stainless steel or aluminum, which are sturdy and easy to clean.
Lastly, you need to choose the right magnets for holding the knives securely. Neodymium magnets are the most commonly used magnets for this purpose as they have a strong magnetic pull. Make sure to select magnets that are appropriate in size and strength for your knife collection.
Preparing The Base
To create a magnetic knife holder, start by measuring and marking the desired length for the holder. Once you have determined the appropriate size, cut the base material accordingly. Remember to smooth the edges and surface of the base to ensure a polished finish. This will not only enhance the holder’s appearance but also prevent any accidental scratches on the knives.
Installing The Magnets
To install the magnets for your magnetic knife holder, first decide on the placement of the magnets on the base. Mark the locations for the magnets evenly spaced apart. Use a drill to create holes for the magnets. Insert the magnets into the prepared holes securely.
Finishing Touches
Once you have completed the main construction of your magnetic knife holder, it’s time to focus on the finishing touches. To achieve a smooth and polished surface, start by sanding the entire surface of the knife holder. Carefully sand all the edges and corners to ensure a uniform finish. This step will help remove any rough spots or imperfections.
After sanding, it is recommended to apply a protective finish to enhance the durability and longevity of your knife holder. Choose a finish that is suitable for the material of your holder, such as a clear polyurethane or lacquer. Using a brush or a clean cloth, evenly apply the protective finish to the entire surface.
Allow the finish to dry completely before using the magnetic knife holder. This will ensure that the finish sets properly and provides adequate protection. It is important to read and follow the manufacturer’s instructions for drying time, as it may vary depending on the specific finish you choose.
Mounting The Knife Holder
Choosing the right location in your kitchen for the knife holder is crucial. Consider a spot that is easily accessible and safe, away from heat sources or areas prone to moisture. Once you have identified the perfect spot, use a level to position the holder correctly. Mark the mounting holes on the wall using a pencil or marker.
Next, it’s time to drill holes in the wall to securely mount the holder. Use a drill bit that matches the size of your screws or hardware. Make sure the holes are aligned with the marked spots on the wall.
Lastly, attach the knife holder to the wall using screws or other appropriate hardware. Align the holes in the holder with the drilled holes on the wall. Tighten the screws firmly, ensuring that the knife holder is securely mounted.
Organizing Your Knives
Organizing your knives is essential to keep your kitchen counter space neat and tidy. One effective way to do this is by using a magnetic knife holder. To arrange your knives on the magnetic surface of the holder, start by ensuring that the knives are securely held by the magnets. This will prevent any accidents or mishaps while you are working in the kitchen. Once the knives are securely held, you can adjust their positions on the holder for easy access and to enhance the visual aesthetics of your kitchen. By arranging your knives on a magnetic holder, you not only keep them organized but also add a functional and stylish touch to your kitchen.
Maintenance Tips
- Regularly clean the knife holder to prevent the buildup of dirt and debris.
- Avoid using abrasive materials or harsh chemicals when cleaning.
- Check the magnets periodically for any signs of wear or damage.
Proper maintenance of your magnetic knife holder is essential to ensure its longevity and effectiveness. Regularly cleaning the knife holder will prevent the buildup of dirt and debris, which can affect the functionality of the magnets. When cleaning, it’s important to avoid using abrasive materials or harsh chemicals that could damage the surface of the holder. Instead, opt for a mild cleaning solution and a soft cloth to gently wipe away any dirt or grime.
In addition to cleaning, it’s also recommended to periodically check the magnets for any signs of wear or damage. This includes checking if the magnets are still securely attached to the holder and ensuring that they have not lost their magnetism over time. If any issues are detected, it’s best to replace the magnets to maintain the holder’s magnetic strength.
Frequently Asked Questions For How To Make A Magnetic Knife Holder

What Magnet To Use For Magnetic Knife Holder?
For magnetic knife holders, use neodymium magnets. These magnets are strong and durable, providing a secure hold for your knives. They come in various sizes and strengths, so choose one that suits your needs. Neodymium magnets ensure your knives stay in place and are easily accessible.
Are Magnetic Knife Holders Safe For Knives?
Yes, magnetic knife holders are safe for knives. They securely hold the knives in place, preventing them from getting damaged or causing accidents.
What Is The Best Finish For Magnetic Knife Holder?
The best finish for a magnetic knife holder is usually high-quality stainless steel.
Do Magnetic Knife Racks Lose Magnetism?
No, magnetic knife racks do not lose magnetism over time. They are designed to have a strong, lasting magnet that securely holds knives in place.
How Do You Make A Magnetic Knife Holder?
To make a magnetic knife holder, you need a magnetic strip, a wooden board, and some adhesive. Simply attach the magnetic strip to the board and mount it on your kitchen wall.
What Are The Benefits Of Using A Magnetic Knife Holder?
Using a magnetic knife holder has several benefits. It helps to organize your knives, keeps them easily accessible, and reduces the risk of accidents by securely holding the knives in place. It also saves valuable counter space in your kitchen.
Can I Use Any Type Of Wood For A Magnetic Knife Holder?
Yes, you can use any type of wood for a magnetic knife holder. However, it’s recommended to use a hardwood such as oak or maple, as they are more durable and long-lasting.
Conclusion
To wrap up, creating your own magnetic knife holder is a simple and practical solution for organizing your kitchen and ensuring the safety of your knives. By following the step-by-step guide outlined in this blog post, you can easily DIY a magnetic knife holder that fits your style and needs.
With a few basic materials and a little bit of creativity, you can have an efficient and stylish kitchen storage solution that will make meal prep a breeze. Say goodbye to cluttered countertops and hello to a functional and organized cooking space!

Leave a Reply